Implementing a Usecase, Part 2: The Usecase
- Declaring the Usecase
- Implementing the Usecase Handler Class
- Implementing the View
- Adding the Menu Item
- Setting the Usecase Permissions
- What's Next?
Declaring the Usecase
Now we're ready to start working on the actual usecase. First, we tell Lenya about
the usecase. The usecase declaration is a patch file for cocoon.xconf.
It is located at $MODULE_HOME/config/cocoon-xconf/usecase-addKnownPerson.xconf.
It adds the person.addKnownUsecase usecase component instance if it doesn't
exist yet (determined by the unless attribute):
<xconf xpath="/cocoon/usecases"
  unless="/cocoon/usecases/component-instance[@name = 'person.addKnownPerson']">

  <component-instance name="person.addKnownPerson" logger="lenya.modules.person"
      class="org.apache.lenya.modules.person.usecases.AddKnownPerson">
    <view template="modules/person/usecases/addKnownPerson.jx"/>
  </component-instance>

</xconf>
This usecase declaration specifies the usecase handler class (in our case
AddKnownPerson) and the JX template which acts as the view for
the usecase (addKnownPerson.jx). For a complete list of the generic
usecase configuration options, refer to the AbstractUsecase
documentation.
Implementing the Usecase Handler Class
The usecase handler object receives user input and manipulates the business objects,
in our case the Person objects, accordingly. It has the following
responsibilities:
- Prepare data to be displayed on the view,
- Validate user input and generate appropriate error messages, and
- Manipulate the business objects.
If you want to follow a strictly object-oriented approach, the usecase handler class itself shouldn't contain any knowledge about the business logic. It belongs to the controller part of the MVC pattern (the other parts of the controller are the usecase sitemap and the flowscript).
The following code snippet shows the usecase handler class. At this point, we implement only the two most important methods:
-
initParameters()initializes the usecase parameters which are used to communicate between the usecase handler and the view. In our case, it compiles a list ofPersonobjects, one for each document with the resource type person. -
doExecute()gets the uuid parameter from the view and adds the correspondingPersonobject to the list of known people.
public class AddKnownPerson extends DocumentUsecase {

    protected void initParameters() {
        super.initParameters();

        Document doc = getSourceDocument();
        Document[] allDocs = doc.area().getDocuments();

        try {
            Set peopleDocs = new HashSet();
            for (int i = 0; i < allDocs.length; i++) {
                if (allDocs[i].getResourceType().getName().equals("person")) {
                    Person person = new Person(allDocs[i]);
                    peopleDocs.add(person);
                }
            }
            setParameter("people", peopleDocs);
        } catch (Exception e) {
            throw new RuntimeException(e);
        }
    }

    protected void doExecute() throws Exception {
        super.doExecute();

        String uuid = getParameterAsString("uuid");
        Document doc = getSourceDocument();
        Person person = new Person(doc);

        Document knownDoc = doc.area().getDocument(uuid, doc.getLanguage());
        Person knownPerson = new Person(knownDoc);

        person.addKnownPerson(knownPerson);
    }

}
Implementing the View
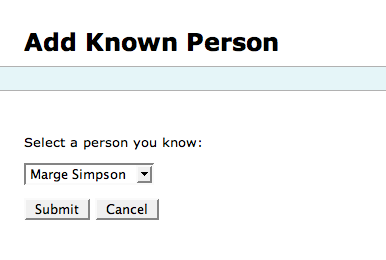
We're using a JX template to implement the view. It allows us to generate XHTML code using properties of Java objects which are passed as parameters from the usecase handler object.
The page contains a form, passing the lenya.usecase and lenya.continuation
parameters as hidden input fields. We choose POST as the form method because we want
to manipulate data on the server, avoiding that the user submits the form multiple times.
We generate a drop-down list containing an option for each person,
using the UUID as the value attribute of the option element.
Remember that the people parameter was set in the initParameters()
method of the usecase handler class.
<page:page xmlns:jx="http://apache.org/cocoon/templates/jx/1.0"
           xmlns:page="http://apache.org/cocoon/lenya/cms-page/1.0"
           xmlns="http://www.w3.org/1999/xhtml"
           xmlns:i18n="http://apache.org/cocoon/i18n/2.1" >

  <page:title>
    <i18n:text>Add Known Person</i18n:text>
  </page:title>
  <page:body>

    <jx:import uri="fallback://lenya/modules/usecase/templates/messages.jx"/>

    <form method="POST">
      <input type="hidden" name="lenya.usecase" value="${usecase.getName()}"/>
      <input type="hidden" name="lenya.continuation" value="${continuation.id}"/>

      <p>
        <i18n:text>Select a person you know:</i18n:text>
      </p>
      <p>
        <select name="uuid">
          <jx:forEach var="person" items="${usecase.getParameter('people')}">
            <option value="${person.getDocument().getUUID()}">
              <jx:out value="${person.getName()}"/>
            </option>
          </jx:forEach>
        </select>
      </p>

      <p>
        <input i18n:attr="value" name="submit" type="submit" value="Submit"/>
        <i18n:text> </i18n:text>
        <input i18n:attr="value" name="cancel" type="submit" value="Cancel"/>
      </p>

    </form>
  </page:body>
</page:page>
Adding the Menu Item
To be able to trigger the usecase, we have to add the corresponding menu item
to the menu of the person module, which is located at
$MODULE_HOME/config/menu.xsp. We add a menu block which shall be
visible only in the authoring area, right below the block containing the
editor menu items. The value of the uc:usecase attribute of the
<item/> element is the name of the usecase as specified
in the usecase declaration.
<menu i18n:attr="name" name="Edit">
<xsp:logic>
try {
Object doc = <input:get-attribute module="page-envelope"
as="object" name="document"/>;
if (doc instanceof Document && ((Document) doc).exists()) {
String doctype = <input:get-attribute module="page-envelope"
as="string" name="document-type"/>;
if ("person".equals(doctype)) {
<block areas="authoring">
<item uc:usecase="bxe.edit" href="?">
<i18n:text>With BXE</i18n:text>
</item>
<item uc:usecase="editors.oneform" href="?">
<i18n:text>With one Form</i18n:text>
</item>
</block>
<block areas="authoring">
<item uc:usecase="person.addKnownPerson" href="?">
<i18n:text>Add Known Person</i18n:text>
</item>
</block>
}
}
}
catch (Exception e) {
throw new ProcessingException("Error during menu generation: ", e);
}
</xsp:logic>
</menu>
Setting the Usecase Permissions
Finally we have to specify who shall be able to execute the usecase.
To accomplish this, we have to add an entry to the usecase policies file of the
publication(s) which will use the person module. The file is located at
$PUB_HOME/config/access-control/usecase-policies.xml.
We allow everyone with the admin or editor role to
execute the usecase:
<usecase id="person.addKnownPerson">
  <role id="admin" method="grant"/>
  <role id="edit" method="grant"/>
</usecase>
Now you can deploy the changes by running the build process and restarting the servlet engine. After that you should be able to connect people using the "knows" relation.

What's Next?
There are some important steps which are missing from the example:
-
In
initParameters(), you should exclude the person itself and all people which she or he already knows. - If you set the relation from person A to person B, it probably makes sense to set the relation from B to A at the same time.
-
To avoid sending stack traces to the user, you should validate the uuid
parameter: Is it provided? Does it refer to an existing person document?
You can do this kind of validation in the
doCheckExecutionConditions()method - just calladdErrorMessage()for each validation error.


